
Staring at scratched, dull hardwood and wondering if it’s time for new floors? Before you price out a full replacement, there’s a question worth asking: are those floors actually done, or just tired?
In many Simcoe County homes, the boards are still sound beneath a worn finish. Professional sanding and refinishing can bring them back to life at a fraction of the cost of new flooring, often in days rather than the week-plus disruption of a full tear-out and install.
But refinishing is not the right answer for every floor. Moisture damage, serious structural problems or a thin engineered-wood veneer can make replacement the better long-term choice. Here’s how to tell the difference, understand the real costs and know exactly what to expect from the process.
When It Makes Sense to Refinish Hardwood Floors
Refinishing is worth considering when the floor is structurally sound but its surface looks worn. Common signs include scratches, dullness, faded finish, minor dents or a colour that no longer suits your home.


A full sand and refinish removes the old surface finish and stain right down to bare wood, then prepares the floor for a new stain or sealer and protective top coats. It can change the colour and sheen, too. You may be able to keep the original character of the boards while giving the room a noticeably different feel.
A lighter option may suit floors with an intact finish and only surface-level wear. A screen, buff and recoat gently abrades the existing coating before a fresh protective layer is applied. It does not remove deep scratches, bare patches or old stain. The floor also needs to be free from wax, polish and other residue that can affect adhesion. An assessment helps determine whether a recoat is suitable. Learn more about hardwood buff and re-coat.
The type of floor matters, and thickness is what decides it. With solid hardwood, it’s the board itself, the amount of wood above the tongue, that determines how many times it can be sanded, alongside its refinishing history. With engineered flooring, the same rule applies to the wear layer: the thin sheet of real wood on top. In most cases that wear layer is too thin to sand, so an engineered floor usually can’t be refinished. A select few, the ones built with a thick enough wear layer, do qualify, which is why an honest in-home measurement matters more than a guess over the phone. Don’t assume an engineered floor can be sanded just because it looks like hardwood.
Floor equity — our term for a floor that can be sanded more than once. A floor with equity isn’t just flooring, it’s an asset that keeps paying you back: each refinish resets the surface without replacing the floor. A board too thin to ever sand again has no equity at all, no matter how good it looked on install day. When you’re choosing new flooring, asking whether it can be refinished is really asking whether you’re buying an asset or an expense.
There’s a second engineered-floor catch that catches owners years later: manufacturers regularly discontinue product lines after a few years. If a section is ever damaged and needs a rip-out, matching your existing floor can be very hard to source unless you kept spare boxes stored from the original install. Solid hardwood avoids that problem entirely, because a refinished board doesn’t need to match a discontinued factory colour.
When Replacement Makes More Sense
A new floor may be the practical choice when the existing boards or the structure below them have problems that refinishing cannot solve.
Consider replacement, or a repair assessment, if you see:
- Widespread cupping, buckling or movement in the boards.
- Soft, loose or badly damaged sections.
- Recurring moisture problems or subfloor damage.
- Deep staining, most often old pet stains, that may extend through the wood.
- An engineered wear layer too thin for safe sanding.
- A need to change the floor’s layout, plank width or material.
First, identify and address any active moisture source. A new floor installed over a damp or unstable subfloor may develop problems of its own.
Deep staining deserves a closer look before you write the floor off, because many deep stains, especially pet stains, can be removed by sanding alone. Others reach too deep into the board for sanding to fully clear, and that’s when a spot repair can still save the refinishing option: the damaged boards are cut out and replaced with feathered-in hardwood, matched in size and bevel to the surrounding floor. Because the new boards go down before sanding, they get sanded together with the existing floor as one surface, then stained and finished the same way, so the repair disappears into the refinished floor instead of reading as a patch. Before you abandon a stained floor, have it assessed, the fix is often smaller than the fear.
Replacement also offers a chance to change the look or construction of the floor. That can be useful when the existing boards cannot be matched, or when the project calls for a different material. But if the current hardwood is sound, replacing it just to refresh the colour may cost more than necessary.
Refinishing vs. Replacement: What Does It Cost?
The size of the project is only part of the price. Staining, stairs, repairs, room layout, removal, disposal and subfloor preparation can all affect the final quote.
As a broad Ontario planning range, published 2026 industry guides put a standard full sand and refinish at about $3–$8 per square foot. New hardwood installation may range from roughly $9–$20 or more per square foot, depending on materials and scope. These are estimates, not fixed prices; included work varies. Removal, subfloor repairs, stairs and other extras may be quoted separately, which is why a written quote that spells out the scope is worth more than any online average.
| Option | Broad planning range | Often suits |
|---|---|---|
| Screen, buff and recoat | About $1.50–$3 per sq. ft. | A sound finish with light surface wear |
| Full sand and refinish | About $3–$8 per sq. ft. | Sound boards with worn finish or dated colour |
| New hardwood flooring | About $9–$20+ per sq. ft. | Floors needing replacement or a new material |
For 1,000 square feet, that could mean roughly $3,000–$8,000 for a full refinish, compared with $9,000–$20,000 or more for new hardwood installation. Actual costs depend on the floor and what the quote includes. Ask whether the estimate covers stain, finish coats, repairs, removal, disposal, trim, stairs, subfloor work and tax. Comparing the same scope makes the decision clearer.
Not sure whether your pet stains are too deep to sand out, or whether your floor’s wear layer is thick enough to refinish? Contact Mossy Pine for a free in-home assessment, and we’ll measure it honestly before recommending anything.
What the Refinishing Process Looks Like
A good result starts with an honest assessment. A refinisher checks the wood, existing finish, wear, repairs and any signs of moisture. For engineered flooring, the wear layer needs particular attention. The floor’s condition determines whether a recoat, full refinishing or another solution makes sense.
For a full refinish, the usual steps are:
- Prepare the space. Furniture is moved, the work area is protected and dust-control measures are put in place.

- Sand the floor. Any repairs are made before sanding begins, so loose or damaged boards are replaced first and the new wood gets sanded down flush with everything else. The old finish and stain are then removed, and the wood is sanded in stages until the whole floor sits flat and smooth. Edging strips the old stain and finish where the big machine can’t reach, and corners and intricate areas around furniture pieces or trim are scraped by hand, with the machines kept well back. All of it is feathered in with the field of the floor as one surface.

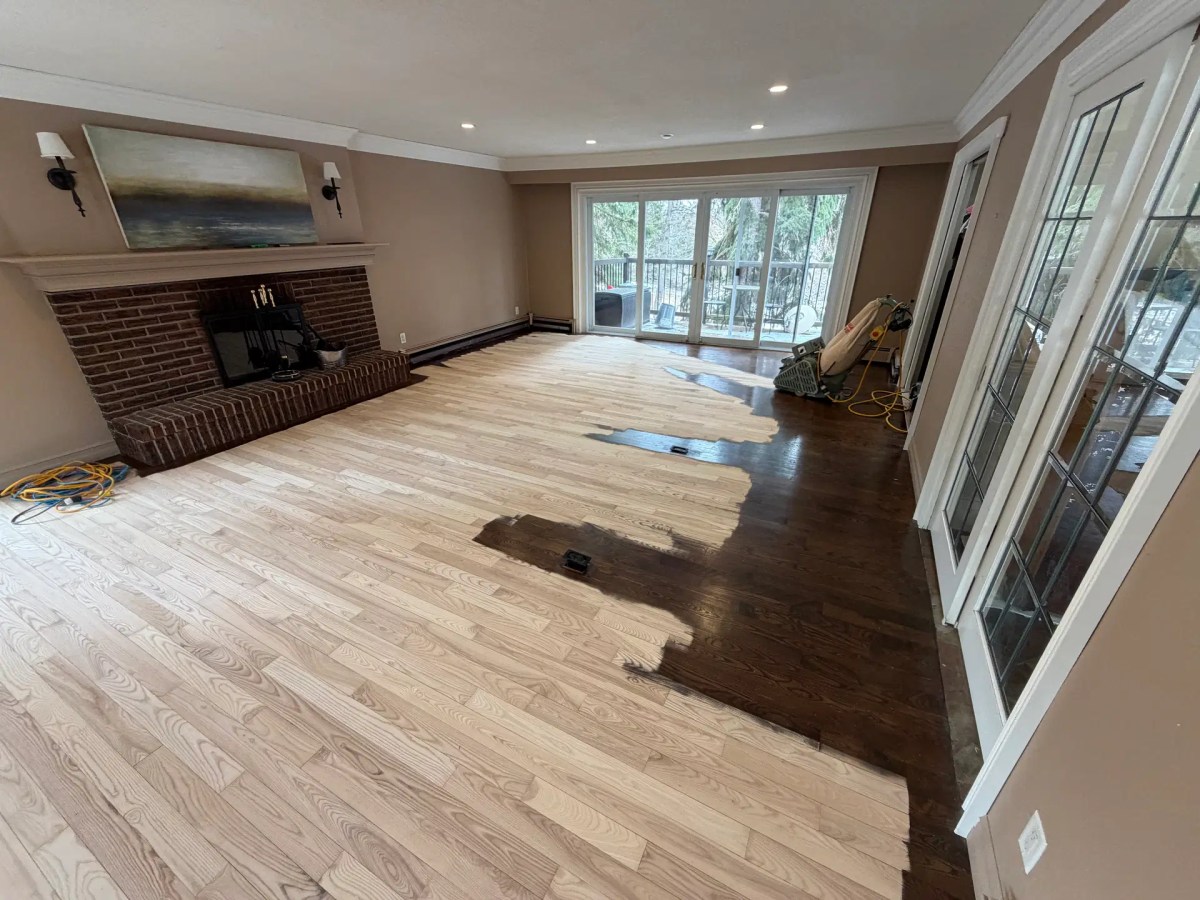

- Prepare for finish. The floor is vacuumed, tack-ragged and cleaned thoroughly to remove all sanding residue before any finish touches it.

- Apply stain, sealer or hardwax oil, if selected. On some species, the floor is water-popped first: a light application of water opens the grain so the stain absorbs deeper and more evenly, bringing out the full character of the wood.

Samples can then help you choose a colour that works with the species and the light in the room.


Colour matching is its own art. It isn’t about opening a stain chart and picking the closest colour. Wood age, grain, sanding, environment, lighting and everyday wear all play a role in how a stain reads, so our target is a 90 to 95 percent match when blending newly refinished hardwood with existing floors, stairs or surrounding woodwork. Getting close is relatively easy. Getting it to belong takes experience, and it’s done the honest way: testing swatches on the actual boards and adjusting the recipe until the colour flows from floor to stair.


- Apply protective finish. The right coating and sheen depend on the floor, the space and how you use it.

- Follow the care instructions. Drying and curing times vary. Ask when you can walk on the floor, return furniture and place rugs.


At Mossy Pine, traditional craft meets modern equipment and finishing systems. Careful preparation, dust mitigation and a finish chosen for the floor all matter. You can read more about our floor and stair refinishing process.


Finding Hardwood Floor Refinishing Near You
If you’re searching for “refinishing hardwood floors near me,” look beyond the headline price. The gap between a good local refinisher and a cheap one usually shows up in four places.
Dust containment: sanding a whole floor sends fine dust through a home unless the equipment is connected to proper dust collection and the work areas are sealed off. Ask how the crew contains dust before, during and after the sanding, because cleanup is part of the job, not a courtesy.
A written scope: a clear quote spells out exactly what’s included, such as repairs, stain, number of finish coats, stairs and cleanup, and identifies items that may be quoted separately like furniture moving or subfloor work. Vague pricing is where budget jobs find their profit.
Insurance and accountability: floor sanding involves heavy equipment, ladders, saws and finishing products inside your home. Ask whether the people working on your floor carry proper coverage, and whether the work is guaranteed in writing.
Who actually does the work: some companies quote the job and hand the sanding to whoever is available that week. Ask whether the crew you meet is the crew that works on your floor, because the assessment matters as much as the sanding. A refinisher who walks the floor, checks the wear layer, tests the boards and explains your options honestly is making decisions your floor will carry for years.
Homeowners in Barrie and Simcoe County also tend to have floors with very different histories. Older homes in Barrie’s established neighbourhoods often carry solid hardwood that has been sanded before, sometimes more than once, and its remaining thickness needs to be read carefully before any more wood comes off. Newer builds in communities like Innisfil, Bradford and Springwater more often have factory-finished or engineered floors, where the wear layer and installation history decide what’s possible. The same applies across Muskoka, Collingwood and the GTA: local conditions and the floor itself matter more than a one-size-fits-all recommendation.
A first visit should feel like an inspection, not a sales call. It’s a walk through the home with a flooring professional who checks the boards, measures what thickness remains, looks for moisture or repair points and answers the refinish-or-replace question on the spot with reasoning you can hear and question. At Mossy Pine, that visit is free and it ends with a written quote and honest advice, whether that advice is to refinish, recoat or replace.

Making the Refinish or Replace Call


If the boards are sound and the finish is tired, refinishing may preserve what you already have at a lower cost than replacement. If damage goes deeper, a careful inspection can help you avoid investing in a finish that won’t solve the underlying problem.
Mossy Pine Floor & Stair serves Barrie, Simcoe County and surrounding areas, including Muskoka and the GTA. Contact us or call or text 705-881-3464 to arrange a free in-home consultation and get straightforward advice about your floor.
See more of our recent projects, reels and customer reviews on Facebook.